How Much Does Crawl Space Vapor Barrier Installation Cost? A Homeowner's Guide
If someone in your family struggles with year-round allergies or asthma, you’ve probably tried everything to improve your home’s air quality.
You clean, you dust, you run air purifiers, but the problem persists. The culprit might not be in your living space at all. Due to a natural airflow pattern, up to 50% of the air on your first floor originates in your crawl space. If that space is damp, it becomes a breeding ground for mold and dust mites, sending those allergens directly into your home.
Installing a vapor barrier is one of the most effective ways to cut off this source of contamination. The crawl space vapor barrier installation cost is a small price for a healthier home environment.
Key takeaways
- A vapor barrier is a plastic liner that covers your crawl space floor to stop ground moisture. This simple step helps prevent major issues like mold, wood rot, and poor air quality throughout your home.
- Spending money on a vapor barrier today can save you from much larger bills for foundation repair, mold remediation, and pest control later. It also helps lower your energy costs by keeping the air under your home drier.
- A DIY installation is risky because you might just cover up a bigger problem, like a foundation leak. A professional inspection identifies the true source of moisture, ensuring the vapor barrier is the right solution and is installed correctly.
What is a crawl space vapor barrier?
It’s easy to forget about the space under your house, but what happens in your crawl space doesn’t stay in your crawl space.
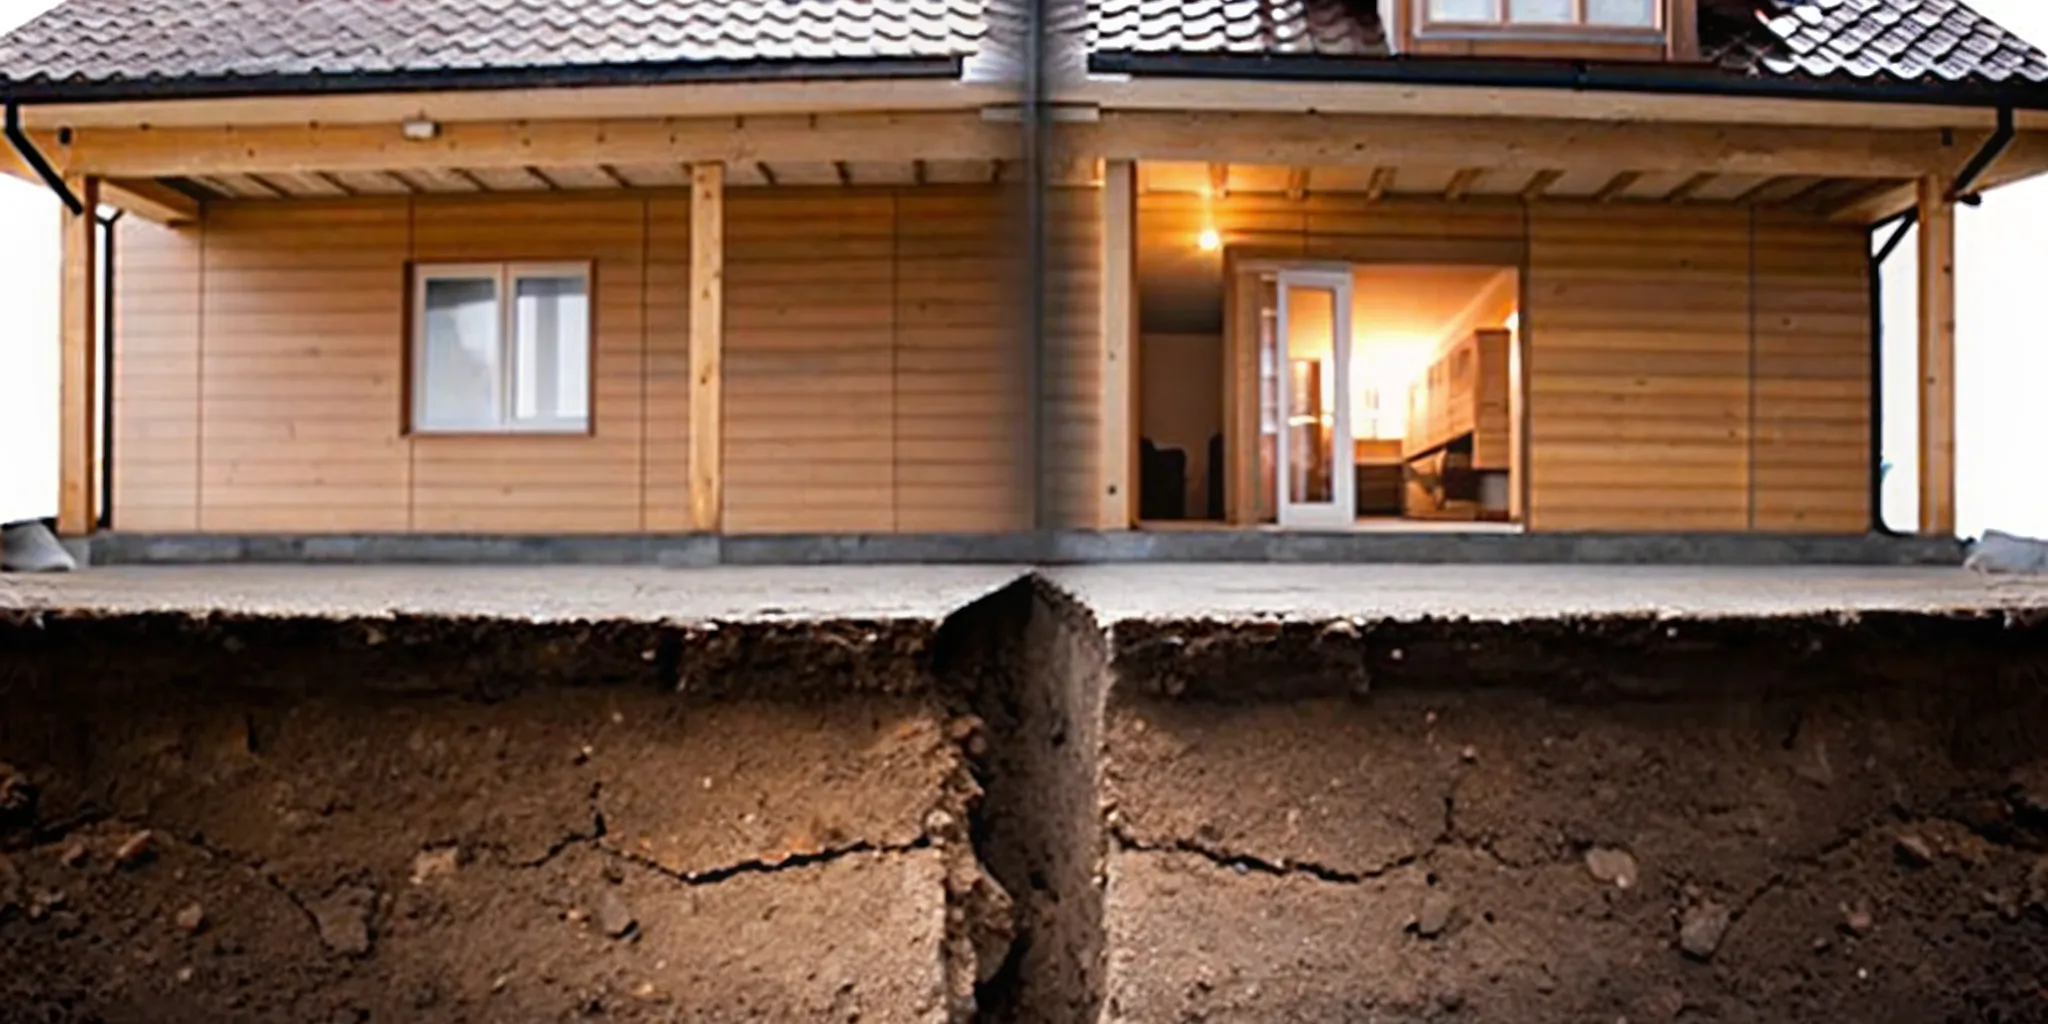
Ground moisture is constantly trying to make its way into your home, and the dirt floor of your crawl space is the main entry point. This is where a vapor barrier comes in.
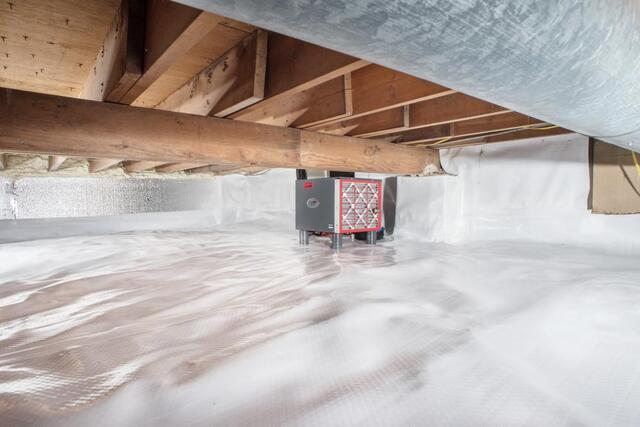
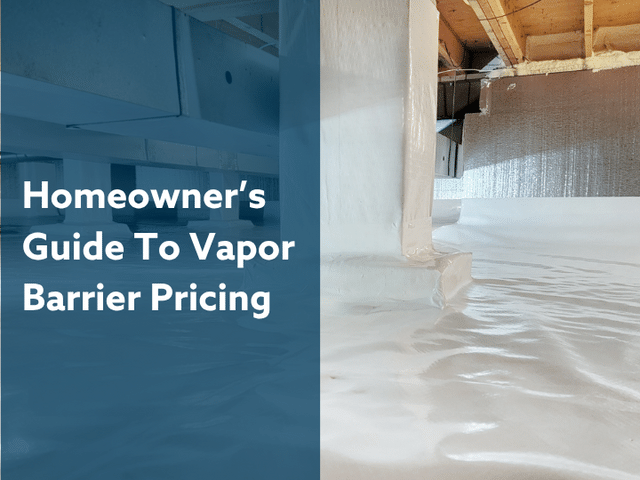
A crawl space vapor barrier is a thick sheet of durable plastic, usually 6 to 9 millimeters thick, that is laid down to cover the entire dirt floor. Its main job is to prevent soil moisture from rising and turning your crawl space into a damp, humid environment. By blocking moisture at its source, a vapor barrier helps protect your home’s structural integrity and the air you breathe every day.
It’s a simple concept, but it’s a critical first step in controlling moisture and creating a healthier home from the ground up.
Why your crawl space needs one
Even though it's hidden, your crawl space has a huge impact on your home's overall health.
A damp crawl space can lead to musty odors, mold growth, wood rot, and even pest infestations. Because of a natural process called the "stack effect," air from your crawl space (and whatever is in it) gets pulled up into your living areas. That means you could be breathing in mold spores and allergens without even realizing where they're coming from.
A vapor barrier acts as your first line of defense against this ground moisture. Installing one is a proactive step that can save you a lot of money and headaches down the road. By keeping the crawl space drier, you help prevent expensive foundation repairs caused by moisture-weakened supports. You also make the space less inviting to mold and pests, protecting your family’s health and avoiding costly remediation. Plus, a drier home is more energy-efficient, which can lead to lower utility bills.
Vapor barrier vs. full encapsulation: What's the difference?
When you start looking into moisture control, you'll likely hear two terms: vapor barrier and encapsulation.
While they sound similar, they offer different levels of protection. A vapor barrier is a great starting point. As we've covered, it's a liner that covers only the dirt floor of the crawl space. It’s a relatively quick and less expensive installation, but its main focus is stopping moisture from the soil. It doesn't address moisture coming through the walls or from outside air vents.
Full crawl space encapsulation is a more comprehensive solution. This process involves covering the floor and foundation walls, and sealing any vents or air leaks to the outside. Encapsulation completely isolates your crawl space from the earth and outside air, creating a clean, dry, and conditioned space. While it's a larger investment and takes longer to install, it provides the ultimate protection against moisture, mold, pests, and energy loss. Think of a vapor barrier as an umbrella for the floor, while encapsulation is like putting the entire crawl space inside a protective bubble.
How much does a crawl space vapor barrier cost?
Figuring out the budget for a home repair project is always the first step.
When it comes to installing a crawl space vapor barrier, the cost can vary quite a bit, so it helps to know what to expect.
Nationally, most homeowners pay between $1,500 and $4,000 for a professional installation. A good rule of thumb is to budget $2.00 to $4.00 per square foot, which typically covers both materials and labor. Think of it less as a fixed price and more as a customized solution for your home’s specific needs.
Of course, this is just a starting point. The final price tag really depends on a few key factors.
The size of your crawl space is the biggest one, but the thickness of the liner you choose and the current condition of the area also play a major role.
For example, if the space needs significant cleaning or repairs before the barrier can even be laid down, that will add to the total cost. A crawl space that is easy to access and relatively clean will be on the lower end of the price spectrum. In contrast, a large, debris-filled space with existing moisture problems will require more work and a higher investment. Let’s break down these numbers so you can get a clearer picture of what to expect for your home.
Cost breakdown by crawl space size
The biggest factor influencing your total cost is simply the size of your crawl space.
The more square footage there is to cover, the more material and labor will be required. To give you a general idea, we can group crawl spaces into a few common sizes. For a smaller space under 600 square feet, you might see costs between $1,200 and $2,800. An average-sized crawl space, typically 600 to 1,200 square feet, will likely range from $2,800 to $4,500. If you have a large or unusually complex crawl space over 1,200 square feet, the cost can start at $4,500 and go up from there, sometimes reaching $7,500 or more.
How material thickness affects price
Vapor barrier liners come in different thicknesses, measured in "mils," where one mil is one-thousandth of an inch. A thicker liner offers better durability and protection against punctures and moisture, but it also costs more.
A basic 6-mil liner is the most budget-friendly option, but it’s thin and can tear easily. A 12-mil liner is a common and recommended middle ground, offering good durability for its price.
For the best protection, especially if you plan to use the crawl space for storage, a heavy-duty reinforced liner between 12 and 20 mils is the way to go. This premium option provides maximum defense against moisture, pests, and damage from foot traffic.
Other potential costs to consider
Sometimes, installing a vapor barrier is just one piece of a larger puzzle.
If your crawl space has pre-existing issues, they need to be addressed first, which will add to the overall project cost. Problems like standing water, mold growth, or pest infestations must be resolved before a liner can be installed, and these repairs can add $1,000 to $4,000 to your bill.
You may also decide to upgrade from a simple vapor barrier to a full encapsulation, which seals the entire space, including the walls, and often includes a dehumidifier. This is the most comprehensive solution for crawl space repair and typically costs between $5,000 and $15,000.
What drives up your installation cost?
When you get a quote for a crawl space vapor barrier, the final number isn't just about a sheet of plastic. Several factors influence the total price, from the condition of your crawl space to the specific challenges it presents. Understanding these variables will help you make sense of your estimate and see why a one-size-fits-all price doesn't really exist for this kind of project. A thorough contractor will assess these factors before giving you a final number.
1. Crawl space size and accessibility
It seems simple: a larger crawl space requires more material and more time, so it costs more.
While that’s true, the accessibility of the space is just as important. If your crawl space has a very low ceiling (less than a few feet high), it becomes much more difficult and time-consuming for a crew to work in. This extra labor can increase the price, even for a smaller area. A professional will need to evaluate not just the square footage but also the actual working conditions before providing an accurate crawl space repair quote.
2. Pre-existing damage like mold, pests, or rot
A vapor barrier is a preventative tool, but it can’t be installed over existing problems. Before any liner is laid down, the crawl space must be a clean, stable environment. If an inspection reveals issues like mold, wood rot, or pest infestations, those have to be addressed first. This remediation is a separate process that adds to the overall project cost. Ignoring these problems and simply covering them up will only trap the issue, leading to more significant structural damage and health concerns down the road.
3. Your local climate and humidity
Living in the Midwest means dealing with a wide range of weather, including hot, humid summers. High humidity is a major contributor to moisture problems in a crawl space. In states like Nebraska, Iowa, and Missouri, the air can be heavy with moisture, which will find its way under your home. This constant environmental pressure means a professionally installed, high-quality vapor barrier is crucial. In some cases, a simple barrier might not be enough, and your contractor may recommend a dehumidifier to properly control the moisture levels, which would also affect the total cost.
4. The overall condition of the space
Beyond specific damage, the general state of your crawl space plays a big role in the installation cost. Is there standing water, mud, or debris left over from construction? All of this has to be cleaned out and the ground leveled before a vapor barrier can be properly installed. This prep work requires extra labor and time, which will be reflected in the final price. A clean, dry, and relatively level crawl space is the ideal canvas, but most homes require at least some cleanup before the real work of waterproofing can begin.
DIY vs. Pro Installation: which is right for you?
Deciding whether to install a crawl space vapor barrier yourself or hire a professional can feel like a tough call. On one hand, the DIY route seems like a great way to save money. On the other, a poorly installed barrier can cause more problems than it solves. Let's walk through what each option really involves so you can make the best choice for your home.
The reality of a DIY installation
If you’re handy and your crawl space is relatively clean, dry, and easy to access, a DIY installation could save you money on labor. You can find basic rolls of vapor barrier material for a few hundred dollars at a home improvement store.
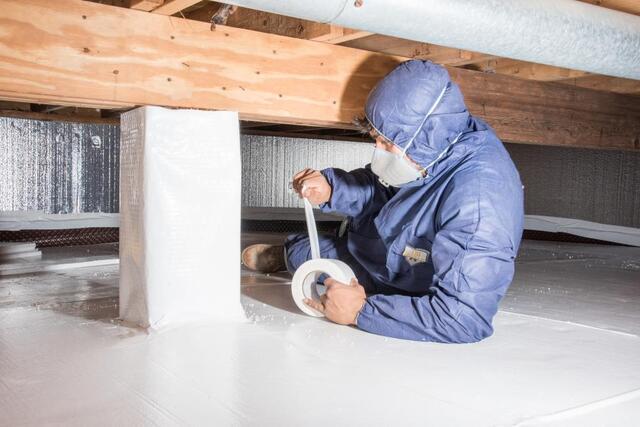
However, a successful installation is more than just laying down a sheet of plastic. Professionals take care to wrap the barrier around the foundation walls, properly overlap and seal every seam, and secure it around piers and pipes to create a continuous shield against moisture. A DIY job that misses these crucial steps may not provide the protection your home needs.
Common (and costly) DIY mistakes
The biggest risk with a DIY project is not knowing what you don't know. If your crawl space has standing water, mud, or signs of pests, it has to be cleaned up first, which adds significant time and effort.
More importantly, an untrained eye can easily miss the root cause of the moisture. Simply covering up existing problems like foundation leaks, mold, or wood rot with a plastic sheet will only trap moisture and make the situation worse. This can lead to more widespread damage and much more expensive repairs down the road. What started as a money-saving project can quickly become an expensive mistake.
The benefits of hiring a professional
Hiring a professional starts with a thorough inspection. An expert can identify underlying issues causing the moisture and determine the right solution for your specific situation. They can tell you if a simple vapor barrier will suffice or if your home would be better served by a full crawl space encapsulation system, which is often recommended for spaces with high humidity or standing water.
A professional crew uses industrial-grade materials and has the experience to ensure every seam is sealed and the entire space is protected. This gives you peace of mind that the job is done right, protecting your home’s air quality and structural integrity for years to come.
Is a crawl space vapor barrier a worthwhile investment?
When you’re looking at your home maintenance budget, it’s easy to wonder if an unseen space like a crawl space is really worth the money.
The short answer is a resounding yes. A crawl space vapor barrier isn't just a sheet of plastic; it's a protective shield for your entire home. Think of it as an investment in your property's structural integrity, your family's health, and your long-term financial well-being. Ignoring what happens below your floors can lead to a cascade of problems, from warped floorboards and musty odors to serious foundation issues.
A damp, unprotected crawl space is an open invitation for moisture, mold, pests, and wood rot. These issues don't stay contained. The air in your crawl space naturally circulates up into your living areas, carrying mold spores and allergens with it.
By installing a vapor barrier, you are taking a proactive step to control the environment under your home, which directly impacts the environment inside it. It’s one of the most effective ways to protect your biggest asset from the ground up. If you're seeing signs of trouble, a professional crawl space repair can make all the difference.
Lower energy bills and fewer repair costs
A damp crawl space can quietly drive up your energy bills. When moisture evaporates into the air under your home, it creates high humidity. This humid air is much harder for your HVAC system to heat in the winter and cool in the summer, forcing it to work overtime and consume more energy. A vapor barrier blocks that ground moisture, helping to stabilize the humidity and temperature. This small change can lead to noticeable savings on your monthly utility bills.
More importantly, spending a few thousand dollars on a vapor barrier now can save you from tens of thousands in future repairs. Unchecked moisture can lead to rotted floor joists, pest infestations, and even serious foundation damage. By investing in a vapor barrier, you’re not just covering the dirt floor; you’re preventing the costly, structural problems that moisture leaves in its wake.
Create a healthier home environment
Did you know that up to 50% of the air you breathe on the first floor of your home comes from the crawl space?
This is due to a phenomenon called the "stack effect," where air naturally flows upward. If your crawl space is damp and moldy, those mold spores, dust mites, and musty odors are rising directly into your living room, kitchen, and bedrooms. This can be a major trigger for allergies, asthma, and other respiratory issues.
Installing a vapor barrier helps create a clean, dry space, which dramatically improves your home's indoor air quality. It acts as a shield, stopping moisture from the soil from turning your crawl space into a breeding ground for mold and mildew.
A dry crawl space means healthier air for your family to breathe every day, making your home a safer and more comfortable place to live. This is a key part of overall basement waterproofing and home health.
Warning signs your crawl space needs help
Your crawl space will usually give you clear signals when it has a moisture problem. One of the most obvious signs is a persistent musty or earthy smell in your home that you can’t seem to locate. You might also notice your floors feel cold or damp, especially in the winter. If you’re brave enough to peek into the crawl space itself, look for standing water, muddy soil, or dark stains on the wooden support beams, which can indicate wood rot.
Visible mold growth, which can look like white, green, or black patches, is another major red flag. It’s important to remember that these issues need to be addressed before a vapor barrier is installed. Simply covering up standing water or active mold will only trap the problem. A professional will first need to handle any water removal, mold remediation, or necessary concrete repairs to ensure the vapor barrier can do its job effectively.
Related Articles
- 4 Home Crawl Space Mistakes
- Does Your Crawl Space Affect The Air Quality In Your Home?
- The Best Way To Insulate A Crawl Space With A Dirt Floor
- How To Insulate A Vented Crawl Space
- How Much Mold In Crawl Spaces Is Acceptable?
- Understanding The Stack Effect
Frequently Asked Questions
How do I know if my crawl space really needs a vapor barrier right now? Your house will give you clues. If you notice a persistent musty smell, feel dampness or cold spots on your floors, or see your wood floors starting to cup or warp, it's time to investigate. These are signs that excess moisture from your crawl space is already affecting your living area. Other red flags include worsening allergies among family members or visible condensation on your crawl space walls or pipes. Addressing these issues sooner rather than later prevents them from turning into much larger, more expensive problems.
What does a professional installation actually involve? A professional installation is much more than just laying down a sheet of plastic. The process begins with a thorough cleanup of the crawl space, which includes removing any debris, rocks, or old, failing liners. The crew will then grade the soil to ensure there are no high spots or areas where water can pool. After that, they install the durable liner, carefully cutting it to fit around all piers and pipes. They then overlap and seal every seam with special tape and fasten the liner to the foundation walls to create a continuous, airtight barrier against ground moisture.
How long does a professionally installed vapor barrier last? A high-quality, professionally installed vapor barrier is designed for the long haul. The industrial-grade, reinforced liners used by experts are incredibly durable and resistant to tears, punctures, and deterioration. You can expect a system like this to last for 20 years or more, protecting your home for decades. As for maintenance, there isn't much you need to do. It’s a good idea to have the space checked periodically during annual home maintenance inspections to ensure the liner hasn't been damaged, but it generally takes care of itself.
Can I just use the plastic liner from a hardware store and install it myself? While you can buy thin plastic sheeting at a local store, it's quite different from the materials a professional uses. The liners sold in retail stores are typically thin (around 6-mil) and can tear easily during installation or if you ever need to move around in the crawl space. Professionals use much thicker (12 to 20-mil), reinforced liners designed for durability. More importantly, a successful installation depends on proper sealing techniques. Without the right expertise, it's easy to leave gaps that allow moisture to get through, defeating the purpose of the barrier.
Article Categories: